Forum Replies Created
- AuthorPosts
Jesse Owens
KeymasterHi Alex-
This is a public forum, so I’ve redacted the rest of your question per your request.
You can reach our Premium Support team for private questions by logging into BoldGrid Central and using the Private Ticket form there.
Jesse Owens
KeymasterHi Steohen-
Thanks for the great question, you’re right that WordPress doesn’t have a super easy way to insert tracking codes into the header or footer of your site.
There are lots of different solutions possible, but probably the easiest way is to use a free plugin like Header Footer Code Manager.
Many different tracking platforms also produce “official” plugins for WordPress, like Google Site Kit and Facebook for WordPress.
Jesse Owens
KeymasterHi Matt-
Thanks for the great question, and thanks for using the BoldGrid WordPress Website builder.
The best way to include your latest blog posts on a page, like your homepage, is to use a Post List block. Check out this quick video where I’ll walk you through how to use one:
Jesse Owens
KeymasterHello Lance-
Thanks for reaching out, and thanks for using the Crio WordPress Theme.
Right now, there isn’t a way to restore the original pages without moving your live pages to the trash can, although you can recover them if you do. You can do that in the Inspirations > Start Over menu.
That being said, you can safely check out all of the pre-designed Crio pagesets using your free Cloud WordPress account that’s included with your DreamHost subscription. Cloud WordPress lets you create temporary, testing, or staging WordPress sites so that you can try out new plugins, or indeed install different Crio sets from Inspirations without interfering with your live website.
To get started, log in at https://www.boldgrid.com/central with the email address you use for your DreamHost account, and you’ll find 15 Cloud installs available for you to use.
Jesse Owens
KeymasterHello Erik-
Thanks for the great question, and thanks for using the BoldGrid WordPress website builder.
By default, WordPress determines the excerpt by using the Read More tag that you insert into your post. It looks like this:

However, some themes may manually limit the size of the post excerpt. For example, in BoldGrid’s Crio Theme, you can change this setting in the Customize > Design > Blog > Blog Page > Post List Settings menu.
Since you’re using a commercial theme, Betheme, I can’t say for sure how you can manage your excerpt settings, but their documentation does say that you can adjust it.
Jesse Owens
KeymasterHello Miklos-
Thanks for the great question, and thanks for using W3 Total Cache.
It’s tough to say for sure, since it looks like you’ve disabled W3 Total Cache right now, but I believe the issue might be caused by the fact that both W3TC and your theme are trying to lazy-load the images.
If you inspect the images, you’ll see a class from your theme,
zeen-lazy-loaded, that implies the theme itself is doing some lazy-loading work. If you re-enable W3 Total Cache, make sure that you have Lazy Loading disabled in your Performance > General Settings > User Experience section.June 17, 2021 at 4:16 pm in reply to: CDN – Editing site host name will not allow slash character #39451Jesse Owens
KeymasterHi Brian-
I just wanted to update you that the 2.1.4 version has been released, you should see the update available in your dashboard shortly.
June 17, 2021 at 2:27 pm in reply to: CDN – Editing site host name will not allow slash character #39435Jesse Owens
KeymasterHi Brian-
Thanks for the report, and thanks for using W3 Total Cache.
In the 2.1.3 release, we fixed a potential security issue with the “Replace Hostname” field, but it was too zealous about removing characters. 2.1.4 is currently finishing up its final testing and should be released within the next few hours with a fix for this problem.
Jesse Owens
KeymasterHi Heather-
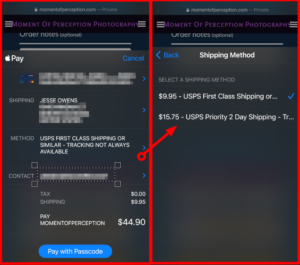
Congratulations! It does look like it’s pulling in the shipping options, both on the product page and the cart.

Cobalt doesn’t have a line 53 in functions.php, and the error
Uncaught Error: Class “WC_Stripe_Payment_Request”looks like you may have added a custom function that was specific to the old plugin. Double-check your functions.php file for any custom code you’ve added that mentions “WC_Stripe”Jesse Owens
KeymasterHello Martina-
Thanks for reaching out, and thanks for your interest in W3 Total Cache Pro!
While we don’t offer “free trials,” we do have a 30-day money-back guarantee. If you do decide to proceed, you’ll have access to all of the premium features and premium support from our team of experts to make sure that you get the full value of the Pro plugin.
If you do decide that it’s not a fit for you, simply let us know and we’ll be happy to refund your purchase.
June 15, 2021 at 1:37 pm in reply to: Featured image width shortened with white border around it #39271Jesse Owens
KeymasterHi Denise-
Thanks for reaching out, and thanks for using the Crio WordPress supertheme.
I checked out your site, and it looks like you may have already solved this issue, because I don’t see the white border you’re describing.
Generally speaking, you’ll want to make sure that the section with the image is Full Width. Look for the gray-colored Edit Section menu, and use the Section Width control to toggle between full-width and contained.
Jesse Owens
KeymasterHi Mike-
Right now, the image is set to “cover” the available space. This is a special attribute for background images to fill the available space, focus on the center of the image, and respond to different device sizes.
For your requirement of always showing the full image on every device size, I’d recommend switching to a normal image, rather than using a background.
First, use the gray-colored Edit Section > Section Width option to expand the section to full-width:

Then, use the Add Media button to add the image, and select Full Size.
Jesse Owens
KeymasterHi Heather-
Thanks for reaching out, and thanks for using the BoldGrid WordPress website builder.
There are three main places where the white space is coming from.
First, inside your call-to-action widget itself, there are five paragraphs with only a space character in them. Each one of those is about 34 pixels tall, so that’s about 170 pixels above your call-to-action button.
Then, below the button, there are 200 more pixels of margin that are pushing the content further down.
Finally, at the very top of your home page content, there’s a row that also has nothing but a blank paragraph in it.
Since your home page doesn’t actually have any content in it, probably the easiest way to fix this is to actually move the call-to-action and button into the page content. That should give you an appearance similar to this:

Jesse Owens
KeymasterHello Dkeoki-
Thanks for reaching out, and thanks for using the Post and Page Builder for WordPress.
The colors of the Post List widget are controlled with the site’s color palette, in Customize > Color Palette.
Design controls, like number of columns, and controls to show or hide various elements are in the Widget’s menu itself. Click on the Post List, and look for the Edit (Pencil) icon above it.
Beyond those controls, you can further customize your post list with Custom CSS. If you can describe what you’re looking to accomplish, we’ll be happy to help provide you with some CSS rules to do it.
Jesse Owens
KeymasterHello Manu-
Thanks for your interest in becoming one of our WordPress Hosting partners!
This is a public forum, but I’ve forwarded your message to our partnerships team and we’ll be in touch with you privately very soon.
Jesse Owens
KeymasterHello Anita-
Thanks for the great question, and thanks for using the Crio WordPress supertheme.
It looks like you’ve already discovered how to create a menu with links to the category archives in your drop-down menu underneath “blog.”
For designing a page that’s more organized by category, I recommend creating a custom page instead of the default “posts page.” Then, you can use the BoldGrid Post List block component. Check out this short video where I demonstrate how to use the Post List:
Jesse Owens
KeymasterHi Antonio-
Thanks for the additional information and the screenshot!
Based on your feedback, I was able to reproduce the error. It only occurs when there are two or more languages in PolyLang, so that’s why we missed it the first time.
I’ve filed a bug report for our developers so we can get this fixed.
In the meantime, the only work-around I was able to find is to either deactivate PolyLang (or remove all but one language) temporarily while you design your footer. Once you have the widget areas added, you will still be able to add new widgets even when the plugin is active, just not modify the layout.
Jesse Owens
KeymasterHi Antonio-
Thanks so much for all your work testing and locating the conflict!
We tested out Crio together with Polylang and we couldn’t get the same problem that you’re seeing. Since the issue occurs in the Customizer, it’s likely that there’s some kind of JavaScript error occurring.
We might be able to find out more information about the issue if you’re able to check your browser’s error console while you recreate the error. Here’s a quick video on how to open your browser’s error console:
If you can either screenshot or copy-and-paste any errors you see there, we might be able to find out what’s causing the problem for you.
June 7, 2021 at 6:09 pm in reply to: How to Center the Site Title and Tagline with Swifty Theme? #38967Jesse Owens
KeymasterHi Kristin-
Sorry about that! The code I provided earlier needs a little modification to work on the pages other than home.
The JavaScript you have is fine, we just need to update the CSS rules I gave you. Replace your current rules with these:
h1.site-title a, p.site-title a { color: #410936 !important; } .header-6 h1, .header-6 h3, .header-6 p { text-align: center;}Jesse Owens
KeymasterHi Antonio-
Thanks for the question, and thanks for using the Crio WordPress Theme.
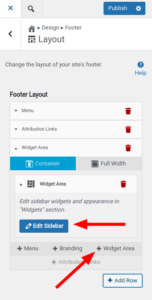
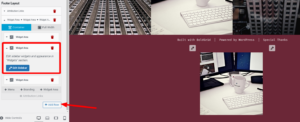
You don’t need to upgrade to Pro to use footer widgets. The widget areas appear “Inactive” until you add them to the footer. Navigate to Customize > Design > Footer > Layout and add a widget area to a new location:

Once you’ve added it, click the Edit Sidebar button to choose and configure the widget for that area.
Jesse Owens
KeymasterHello Mona-
Thanks for reaching out, and thanks for using the Post and Page Builder for WordPress.
I’m sorry to hear about the issues with your slider. I took a look around the different pages of your website, but I didn’t see any sliders so I could take a look for you. Can you include a link to a page that has a slider?
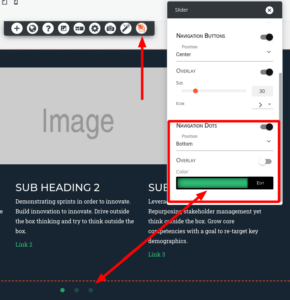
Often, you can find the dots by adjusting the overlay color, as illustrated in this picture:

Also, keep in mind that your slider will not “Autoplay” while the mouse is hovering over it. That’s to prevent frustrating your users trying to click on something and having it move out of the way.
Jesse Owens
KeymasterHello Carla-
Thanks for reaching out, and thanks for using the Crio Premium WordPress theme.
The most common thing that causes problems with loading the customizer, either making it take a very long time or never loading at all, is some kind of JavaScript error.
The most common thing that causes JavaScript errors is some kind of conflict with a plugin. Did you recently add any plugins to your website around the same time you noticed the problem?
One troubleshooting step that can help determine what might be causing the issue is to examine your browser’s error console while you try to use the customizer. Here’s a quick video on how to open and examine the error console:
If you can do that, and let us know if you see any errors there, we might be able to help you determine the cause of the problem.
Since you’re a Premium Member, you can also utilize our Premium Support System so we can take a closer look for you as well.
Jesse Owens
KeymasterHi Anita-
Thanks for reaching out, and thanks for using the Crio Pro WordPress Theme.
The answer to this is a little easier to show than to tell, so I took a few minutes to record this short video for you, if you have about 3 minutes to watch:
To summarize the video, the easiest way to do this is to clone your header, and then use the responsive utilities to either show or hide one of the clones on each device.
Jesse Owens
KeymasterHi George-
Glad to hear you’re making some progress!
Is there a way of targeting and excluding items on the return trip? […] without deleting all the other folders/add on domains/etc that exist in public_html.
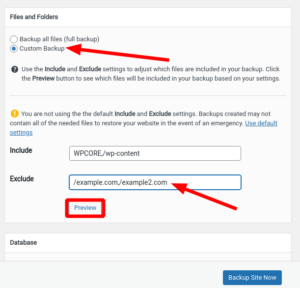
Total Upkeep won’t overwrite anything that wasn’t in the backup file, so any excluded files and folders won’t be deleted when you restore the backup.
If I’m understanding your second question correctly, the
art1.ca,art2.com, andart3.comfolders are inside your site’s directory?First, eliminate the extra spaces you have there, and make sure the
/character is in front of the directory name, so it looks like this:
.git,node_modules,/art1.ca,/art2.com,/art3.com/You should be able to confirm that you’ve got the excludes correct by clicking the Preview button and checking to make sure they’re all excluded.
Jesse Owens
KeymasterHi Martin-
Thanks for reaching out, and thanks for using the Crio WordPress theme for business.
Right now, there isn’t an option to make the header background transparent with the default controls, although we are currently working on adding this.
There are two ways you can accomplish this right now. You can use Custom Page Headers to design a header with a transparent background.
Or, you can use one of the built-in header designs along with a line of Custom CSS. To use Custom CSS, navigate to Customize > CSS / JS Editor and paste this line into the CSS Code field:
div.site-header #masthead { background: transparent !important; }June 4, 2021 at 6:34 pm in reply to: How do I edit the Home page header colors for Crio theme? #38848Jesse Owens
KeymasterHello Donna-
Thanks for reaching out, and thanks for using the Crio WordPress theme for Business.
First, you can set the main color palette in Customize > Colors. By default, the first color in the palette is the header’s background, and the last color is the header text.
Then, you can further customize the background color and the text colors in the Customize > Design > Header menu. Here, you’ll find options for the Background, Site Title and Tagline, each of which lets you choose a color from your main color palette:

Additionally, you can customize your menu’s colors in Customize > Design > Menus.
Jesse Owens
KeymasterHi George-
Thanks for the clarification, I misunderstood and I thought your target site had its core files in public_html with all the other sites.
In the situation you described, it should not be backing up your other sites. Instead, I suspect there’s something very large inside your
arttocanvasdirectory. You’re right that WPCORE is only the core files of WordPress.There is a tool included in Total Upkeep to help with this. Navigate to Total Upkeep > Settings > Backup Process and enable the option for the Filelist Analysis. Attempt to create another backup, and then you’ll find the analysis in your Total Upkeep > Tools > Logs. This log file will try to locate any large files and will give you a list of them along with their directories.
Common things to look for are backups that might have been created by another plugin. Check your wp-content folder for anything other than
uploads,plugins, andthemes.Another common situation is just having lots and lots of media. If you have any large videos, or tons of images and media, you can also exclude
/wp-content/uploads.Jesse Owens
KeymasterHi George-
Thanks for the great question, and thanks for using the Total Upkeep WordPress Backup Plugin.
You can exclude your other websites’ directories by selecting the option for a Custom Backup when you create it.
You can do this both when you create a manual backup, as well as for all of your scheduled backups, in the Total Upkeep > Settings > Backup Storage menu.
Also note that you can use the Preview button here so that you can double-check that you got all of them in the list of excluded directories.
June 3, 2021 at 5:49 pm in reply to: How to Center the Site Title and Tagline with Swifty Theme? #38820Jesse Owens
KeymasterHi Kristin-
Thanks for reaching out, and thanks for using the Swifty Theme!
Swifty’s header design is hard-coded, but it is possible to accomplish this with a little bit more custom CSS and a little bit of JavaScript. If you’re interested in getting full control over your header design without any coding, I recommend checking out our newest theme, Crio.
If you’d like to stick with Swifty, here’s what you’ll need to do. Navigate to Customize > Advanced > Custom JS & CSS.
First, add this line to your Custom Theme CSS to center both your site title and tagline:
.header-6 h1, .header-6 h3 {
    text-align: center;
}
Then, add these two lines to your Custom Theme JS to remove the empty column on the right of your current title, and to make the column full-width:
jQuery('.row.header-6 .header-6').addClass('col-md-12').removeClass('col-md-6');
jQuery('.row.header-7 .header-7').remove();
Make sure to watch out for the
//characters that get added to your JavaScript, and delete those to make sure both lines take effect.Jesse Owens
KeymasterHi Joon-
I’ve contacted you via email as well as our partners at Plesk. We’ll pick up the conversation there, thanks!
Jesse Owens
KeymasterHello Aleksander-
Thanks for reaching out, and thanks for using one of our Platinum WordPress Hosting partners, DreamHost!
To transfer your Cloud WordPress site over to your DreamHost account, you can use the Total Upkeep plugin to easily migrate and publish your site.
Here’s an article with detailed instructions.
Here’s a brief summary.
First, make sure you set the password on your Cloud WordPress account. It’s usually random, and you’ll need to know it once you migrate the site. Navigate to Users > All Users, select your username, and scroll down to the password field. Click Save.Next, make a backup of your site on the cloudwp.dev address in the Total Upkeep > Backup Archives menu. Then, navigate to the Total Upkeep > Transfers tab, and click Get Download Link. Copy that down to use soon.
Finally, log into your account on DreamHost. If you don’t already have it, install the Total Upkeep plugin on your site there. Navigate to the Transfers tab there, select Destination, and paste the link from the first step there. Follow the steps to Upload and Restore the backup, and your site will be live!
June 2, 2021 at 3:34 pm in reply to: Masonry Gallery Only Looks Proper When Resizing The Window Slightly #38775Jesse Owens
KeymasterHi Emmett-
Thanks for reaching out, and thanks for using the BoldGrid Post and Page Builder for WordPress.
As was mentioned in the thread you linked, the Gallery plugin has a limitation about detecting the screen size when the images are “above the fold” of the website- that is to say, visible without scrolling down.
The easiest way to fix this is to add some content to “push” your gallery down, however there is a “hack” you can use to work around the limitation.
To use the “hack,” navigate to Customize > Advanced > Custom JS & CSS and paste this JavaScript snippet into your Custom Theme JS:
jQuery(document).ready(function() {
setTimeout(() => { window.dispatchEvent(new Event('resize')); }, 1);
});
Be sure to delete the
//characters that are automatically added to the first line when you first paste it in.Basically, what this does is wait 1 millisecond after the screen is “loaded,” and triggers the resize event to fool the gallery into thinking it has been resized.
June 2, 2021 at 10:49 am in reply to: How to Cancel W3 Total Cache if I don’t Know the Account? #38760Jesse Owens
KeymasterHello Kyle-
Thanks for reaching out, I’m sorry to hear that you no longer need W3 Total Cache, but we’re happy to assist.
This is a public Support Forum, so we can’t collect the personal information here needed to locate the account, but if you can contact us via our billing support form with the information you do have about the account, we’ll be happy to help you locate and cancel the account.
Jesse Owens
KeymasterHi Joon-
Thanks for reaching out, and thanks for being one of our BoldGrid WordPress Hosting partners.
Due to a limitation in the Plesk integration, it’s pretty tough to “Downgrade” the license package. If you do follow their advice to cancel the existing license, and add a new pay-as-you-go license, all of your current customers would need to have their Connect Keys updated.
Since you’re one of our valued partners, we may be able to migrate your existing licenses to your new plan, but it will take some manual intervention by our team, and we should work together privately to work out a plan that’s best for you and your customers.
Can you reach out directly to our partnerships team using this contact form so we can coordinate with you on this change and make it as smooth as possible?
Jesse Owens
KeymasterHello Neil-
Thanks for reaching out, and for using BoldGrid’s WordPress Website Builder suite of plugins.
The Travel Lite theme isn’t a BoldGrid theme, and from what I can tell by trying it out it doesn’t look like it has any way to customize the Page Title’s color or add additional Google Fonts, like Bilbo.
In order to add the font, I’d recommend using a plugin like Google Fonts Typography.
Then, you can use the Travel Lite’s Additional CSS menu to add these lines:
h1.site-title {
 font-family: 'Bilbo','Oswald',Impact,Helvetica,sans-serif;
 color: #0f014f;
}
.label-text h3 {
 font-family: 'Bilbo','Oswald',Impact,Helvetica,sans-serif;
 color:  #e5c55b;
}
I’ve added fall-back fonts to the one included with the theme, Oswald, and its fall-backs as well, just in case you don’t have the Bilbo font installed yet.
Jesse Owens
KeymasterHi Terence-
Thanks for the great question, and thanks for your interest in Total Upkeep Premium.
Both the free version and the premium versions of Total Upkeep can only back up database tables that use the WordPress Database prefix (
wp_by default). You can find your database prefix by checking yourwp-config.phpfile.Jesse Owens
KeymasterHi Alessandro-
In order to “see” the theme updates for Grid One that are available, the BoldGrid Inspirations plugin has to be installed and active.
Alternatively, you can download the latest version of Grid One directly from this link, and install it by navigating to Appearance > Themes > Add New.
- This reply was modified 3 years, 10 months ago by
Jesse Owens. Reason: fix link
May 25, 2021 at 3:44 pm in reply to: How to display Media Information like Caption, Description? #38478Jesse Owens
KeymasterHello Annette-
Thanks for reaching out, and thanks for using the Post and Page Builder for WordPress.
I took a look at the gallery on your “Available Paintings” page, and I was able to see all of the information for each painting. Can you link to or be more specific about which images you’re not seeing the information for?
I also noticed that you’re using the Gmedia Gallery plugin for this gallery. That plugin has a dedicated support forum here, if you need help specifically with your gallery.
May 25, 2021 at 3:33 pm in reply to: 503 Service Unavailable after installing W3 Total Cache and Total Upkeep #38475Jesse Owens
KeymasterHello Dominic-
Thanks for reaching out, I’m very sorry to hear about the errors after installing W3 Total Cache and Total Upkeep.
While we create the plugins, we don’t have any access to your website to activate or deactivate them remotely. Your web hosting provider may be able to help, or you can use these instructions to deactivate a plugin using FTP or a File Manager, or using WP-CLI if you have access to SSH.
May 25, 2021 at 3:26 pm in reply to: Can I restore a deleted Menu or Widget? How can I add a new row to my Footer? #38473Jesse Owens
KeymasterHello Meredith-
Thanks for reaching out, and thanks for choosing the Crio WordPress theme for business.
Unfortunately, menus and widgets don’t have a “Trash” bin, so they’re not easily recoverable without restoring a backup of your website. If you’re only
That being said, it’s easy to create a new menu with social media icons. Any menu that contains custom link type menu-items to a social network will automatically show icons.
Right now, there isn’t an alignment option available for widgets in the footer, but this is a feature we’re working on. However, there is a “workaround” you can use.
In your Customize > Design > Footer > Layout menu, add three widget areas to your new row:

Then, add your new widget to the middle widget area, leaving the other two empty.
- This reply was modified 3 years, 10 months ago by
- AuthorPosts

